


5 out of 5


Pricing Note
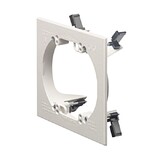
Product Description
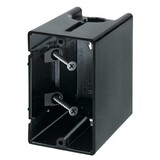
Manufacturer part number: ARL-F102
Fast and easy to install Mounts directly to a wood or steel stud for a super secure installation Angled screws inside the ONE-BOX affix it firmly to the stud - it has no "wings" so there's no wobble For a variety of wall thicknesses, the ONE-BOX is also removable, adjustable, and remountable 2 hour fire rating UL listed
Specifications:Quantity: 1 Type: 2-Gang Vertical ONE-BOX Cubic Inch Capacity: 42.0 Knockouts: 4
Arlington's ONE-BOX Non-Metallic Outlet Boxes are versatile, non-conductive outlet boxes for new or retrofit construction.The box mounts directly to a wood or steel stud.
Features:Specifications:
 Attention CA Residents: Prop 65 Warning
WARNING:
This product can expose you to chemicals which are known to the State of California to cause cancer, birth defects, or other reproductive harm. For more information, go to www.p65warnings.ca.gov.
Need more information?
Our staff are available to answer any questions you may have about this item
Our staff are available to answer any questions you may have about this item
Customer Reviews
By DaveC
Date: April 28, 2017
These are excellent for adding a second 34;gang34; to a one gang original 34;new work34; installation. 34;New work34; is when you can see the wall studs and you hammer in a wiring box with the attached nails. Previously, 34;old work34; was done with boxes which had little flaps that you would tighten and they would essentially clamp down on the sheet rock around the box. Ok in strength but nowhere near as strong as these are. I use these whenever I want to add a second 34;gang34; to what's already existing such as installing a ceiling fan in place of a ceiling light when you want to control the light and fan from the same wall spot. Or adding under cabinet lighting and sharing a single, 2-gang box, with both a wall outlet and the under cabinet lighting. After turning off electricity at the circuit panel, I simply take off the cover plates, put this box over the current 1-gang box such that the second gang is not also covering that the original box is covering and trace the outline. Then, using a sheet rock push saw, cut out the new outline. After that I disconnect the wire or outlet from the wiring, marking the wiring as needed, as you can't take out the old box with the wires still connected. After that, I use a big screwdriver or other pry tool to separate the original 1-gang box from the stud removing the wiring from the old box and inserting them into the new 2-gang box. Then just use a drill with long phillips head bit to screw the new 2-gang in place. As you tighten the screws, it does work its way a little deeper into the wall so you'll want to start with it 1/1634; to 1/834; further out than you'd like it to end at. Also, tighten one screw about half way, do the other half way, and then finish the first to help minimize this movement. Add your new switch or whatever and pirate power needed from the original 1-gang as appropriate for your project and you're good to go.
Rating:  [5 of 5 Stars!]
[5 of 5 Stars!]
Items 1 - 1 of 1 reviews
1